📸 Snapseed Photo Editing App Full Tutorial (2025 Guide)
Snapseed, developed by Google, is one of the most powerful and user-friendly mobile photo editing apps available today. Whether you’re a beginner or a seasoned photo editor, Snapseed offers professional-level tools and filters that are easy to use and completely free.
In this full tutorial, we’ll walk through Snapseed’s features, tools, and techniques step-by-step so you can create stunning, polished images right from your smartphone. This blog post is designed to guide you from importing photos all the way to exporting share-worthy edits for social media or blogs.
🔁 Getting Started with Snapseed
Step 1: Download and Open the App
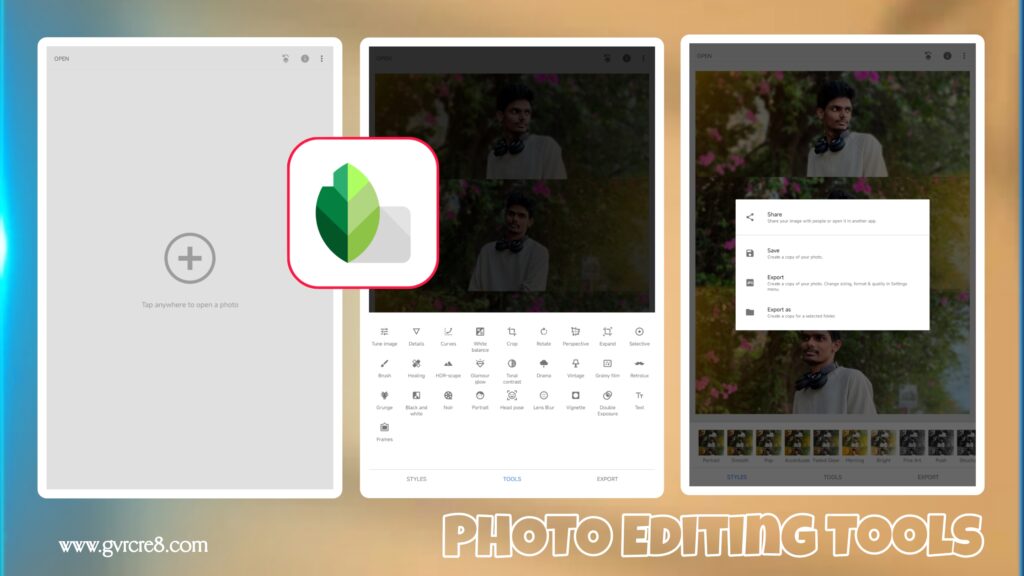
Snapseed is available for both Android and iOS. After installing:
- Open the app.
- Tap anywhere on the screen to open your photo gallery.
- Select the image you want to edit.
⚙️ Snapseed Interface Overview
Once your photo loads, you’ll see three main tabs at the bottom:
- LOOKS — Preset filters for one-tap editing.
- TOOLS — Manual editing tools for fine adjustments.
- EXPORT — Options to save, share, or open your final edit.
✨ Snapseed Tools: Full Breakdown
🔦 1. Tune Image
This is your go-to tool for adjusting brightness, contrast, saturation, ambiance, highlights, shadows, and warmth.
- Swipe up/down to select a setting.
- Swipe left/right to adjust the intensity.
Pro Tip: Use “Ambiance” to enhance colors and shadows with a natural look.
🌈 2. White Balance
Correct the color tone of your photo.
- Adjust temperature and tint manually.
- Use auto white balance or the eyedropper tool for precision.
🌇 3. Details
Enhance texture and sharpness:
- Structure: Boosts detail and contrast.
- Sharpening: Makes edges crisp.
🎨 4. Curves
Advanced tool for brightness and contrast control across tonal ranges.
- Adjust RGB curves for creative effects.
⚖️ 5. Crop
Standard aspect ratios: 1:1, 3:2, 16:9, etc.
- Rotate and scale to frame your subject better.
🌓 6. Rotate
- Straighten your photo or rotate it 90 degrees.
- Snapseed can auto-level horizons for you.
🐾 7. Perspective
- Fix tilted images.
- Options: Tilt, Rotate, Scale, Free.
🎨 8. Expand
Unique Snapseed feature to “add space” around your image.
- Uses content-aware fill to expand the canvas.
⚡ 9. Selective Tool
Make pinpoint adjustments to brightness, contrast, saturation, and structure.
- Tap a spot on the image, pinch to size the area.
- Great for targeted edits without affecting the whole photo.
🔮 10. Brush Tool
Apply changes manually by brushing over areas:
- Options include Dodge & Burn, Exposure, Temperature, Saturation.
❌ 11. Healing Tool
Remove blemishes, dust, or unwanted objects with one tap.
- Works well for minor corrections.
📷 12. HDR Scape
Adds high-dynamic range (HDR) effect to photos.
- Four styles: Nature, People, Fine, Strong.
- Adjust filter strength for best results.
🎭 13. Glamour Glow
Softens skin tones, adds glow for portraits.
- Excellent for beauty and fashion photography.
💃 14. Portrait
Auto-enhances facial features.
- Tools: Face spotlight, Skin smoothing, Eye clarity.
😎 15. Lens Blur
Simulates shallow depth of field.
- Choose blur shape, size, and transition.
😉 16. Vignette
Darkens corners to draw focus to the center.
- Adjust outer/inner brightness.
🎨 17. Text & Frames
- Add stylized text overlays.
- Customize fonts, colors, and transparency.
- Add elegant or decorative frames.
🌈 18. Double Exposure
Blend two photos creatively:
- Choose blend mode: Lighten, Darken, Overlay, etc.
- Control opacity and alignment.
✏️ 19. Grunge, Retrolux, Drama, Vintage
- Stylized filters for artistic edits.
- Ideal for blog and Instagram aesthetics.
→Photoroom
🌟 Snapseed Editing Workflow Example
Let’s edit a portrait photo step by step:
- Tune Image — Increase brightness and ambiance.
- White Balance — Slightly warm up skin tones.
- Details — Add some sharpening.
- Portrait Tool — Soften skin and highlight face.
- Lens Blur — Create background blur for depth.
- Healing Tool — Remove blemishes or distractions.
- Vignette — Focus viewer’s attention.
- Text — Add a quote or watermark.
- Export — Save the photo to your device or share online.
📰 Snapseed for Social Media & Blogging
Snapseed is ideal for enhancing photos for different platforms:
- Instagram: Use Looks + Curves + Vignette for a clean aesthetic.
- Pinterest: Add vertical cropping + Text overlay + Glow effect.
- Facebook: Sharpen faces + brighten backgrounds.
- Blog Posts: Maintain natural colors, clarity, and add subtle text.
- Thumbnails (YouTube): Crop to 16:9, enhance brightness, add dramatic filters.
✨ Exporting Photos
After editing:
- Tap Export
- Choose from:
- Save: Saves the final image to your phone
- Export As: Rename and resize before saving
- Share: Directly post to social platforms
- Open In: Send to another app like Lightroom or Canva
Snapseed saves your edits in full resolution without watermarks.
🎓 Tips for Better Snapseed Editing
- Zoom in to make precise healing and brush adjustments.
- Use selective edits to highlight your subject.
- Create your style by combining filters and curves.
- Don’t overdo it – keep edits natural and realistic.
- Use Snapseed + Canva to create finished posts with text/designs.
🌟 Final Thoughts
Snapseed remains a favorite in 2025 due to its powerful tools, intuitive design, and zero cost. It enables everyone from casual users to professionals to create stunning images directly from their phone. Whether you’re building a brand, running a blog, or simply want to make your photos look better, Snapseed offers everything you need in one sleek app.
Mastering Snapseed will elevate your editing game, improve your content quality, and give you the creative freedom to express your unique visual style.